Problems with defeating Axemen or piloting a solid Axemen deck yourself?
I know that feeling, so let's look at the deck in detail!
Hi everyone, Green Cricket here doing weekly Gwent guides, requested by you down in the
Youtube comments below, so we can master the game and reach the goals we set ourselves!
The content of this video will be:
The decklist, with explanations of the synergies A mulligan guide
Our general plan for playing this deck an analysis of every matchup and how we need
to adapt to that and an example match.
Let's start with the decklist and why we use exactly those cards and not Derran for example.
For those who are newer to the game: Axemen will buff themselves by 1 for every
damage enemies on the opposite row receive, meaning they will receive 1 point every round
for a Weather tick, 3 points every round if your Skellige Storm hits 3 units on the enemy
row and 4 points for each Warship that is played.
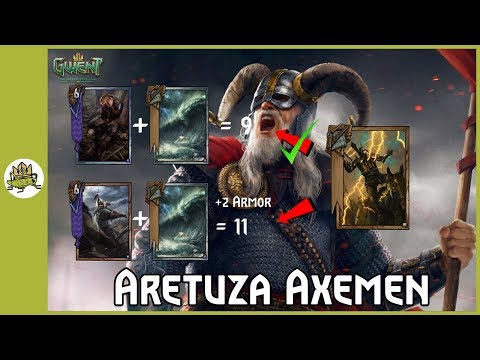
They are great as a finisher in combination with our Leader, which will split 9 damage
to enemies on the opposite row, therefore triggering your Axemen 9 times.
So if you have two Axemen on the board and drop Harald you can do a 33 points swing!
However, Axemen are easily countered by cards like Scorch, Mandrake and so on, so one of
the most important lessons of this guide is, that you should not rely on your Axemen too
much.
A lot of games you will win, without your Axemen even developing value and that is thanks
to our ships.
Warship is a solid 11 point play, with the ability of removal, which is handy to kill
off enemy elves or triggering our Iris.
If you have Axemen on the right row, you will also trigger them for 4 points each.
Whaler is especially useful when you have Gold Weather on the board because they are
able to move an enemy to a row you like, for example, an empty row with weather on it or
into the row, where your Axemen are already waiting to get buffed.
Pirate Captain enables us to pull Warships or Corsairs from the deck and Spearmaiden
can be used to pull any other bronze except Corsairs.
Corsairs are the most versatile cards in the deck because as soon as you have a Whaler
or a Warship in the graveyard, you have the free choice which one you want to rez, which
lets you adapt to the current board situation.
Restore is best used onto a Pirate Captain in round 3 for a big powerplay, but a Spearmaiden
also makes a good target!
Typically I don't use it on Axemen, except I am really sure that there are no counters
in the enemy deck and my Axemen is able to grow.
Sigdrifa lets you resurrect everything except corsairs and Skellige Storm deals damage to
3 units on a row, which is a lot of damage on its own, but really skyrockets, if you
are able to place an Axemen onto that row as well.
Now let's talk about what makes this deck different than the standard Axemen deck, which
play Derran.
The problem with Derran is, that he is even more easily counter-able than axeman, thanks
to his low health.
A skellige storm is enough to get Axemen out of Alzur's Thunder range, but Derran will
still die to it.
Instead, we use Iris, to have a big round 3 finisher, where the only condition is, that
she needs to die.
And we have a lot of tools to do so, with Whalers and Warship.
Especially in combination with a Restored Pirate Captain, you can immediately setup
the board for her, granting you more value than Derran most of the time.
Udalryk we need to counterspy and to look for the cards we need, while Skjall is able
to pull Iris or Udalryk, depending on whats left in the deck.
Through Hym, we have perfect control over this, by allowing us to either play Udalryk
or Iris directly or by playing Skjall into the one card which is still left in your deck.
Gold Weather is able to provide an insane amount of value especially if you can use
Whalers to place the enemy's units onto the different rows.
Birna Bran is another Skellige Storm with a 6 point body.
Just plain good.
Nothing more to say about it.
When you start the game, you need to be mindful of your Mulligan!
Cards you want to keep are: Pirate captains, Whalers, Axeman, Spearmaiden,
as many weathers as possible and Hym.
Cards you want to get rid off are: Corsairs, because you don't have anything
to resurrect!
Warships, so you can pull them with captains and assure your captains don't brick
Udalryk, if you have Iris on hand and you are able to pull it with Skjall or Hym.
Depending on your enemy, you need to adjust your Mulligan, but we talk more about this
in the matchup section.
Let's move to the general gameplay plan: Axemen like red-coins, so if we are on blue
we typically dry pass, except the matchup does not allow that, but more about this in
the matchup section.
Other than that, we always open with Gold Weather.
I was hesitant about this for a long time because I thought I need to bait the enemy's
weather clear first, but that's pretty hard and loses you a lot of value.
Better to just play it straight into their face and get the clear out.
If you have more weather you just follow up with that after the clear, if not then you
need to rely on your Ships to win this.
Nothing is lost because weather clear is always a very low tempo play.
If the weather sticks, we will use Whalers to position the enemies, to get the maximum
value out of the weather.
As soon as we have 3 targets in a row, which won't die immediately, we follow up with Skellige
Storm to further maximize the weather damage.
This is the row, where our Axemen have the best chance to stick, so typically we follow
up by placing them on the board.
Then we follow up with more ships, ideally with Warships to gain points and to setup
our graveyard for round 3.
Try to stay ahead and get card advantage, so we can pull off a powerful finisher.
A short round 3 is where a lot of Axemen deck struggle, but this deck has a chance to shine.
By setting up our board with Sigdrifa into Axemen, Restore into Pirate Captain into Corsair
in a ship, we can put a lot of units onto the board in only a few turns, getting the
full value of Iris, which we will destroy with the resurrected warship.
This is often enough, but don't forget that Harald is also a 15 point play, so keeping
him for round 3 is a good idea.
The best situation is when we have last play and we know we can make an Axemen stick to
the board because, for example, Henselt's last card is Bloody Baron.
In that case, we resurrect or drop the Axeman and play Harald as the last card for extra
9 points on the Axemen.
Some general tips: If the enemy spies you in round 2 and you
use Hym to pull your spy, then he can't drypass on you because of the extra 3 points of Hym.
You can also use Hym into Skjall into Udalryk to only lose 5 points for getting card advantage,
which can push an enemy out of the round, especially they are under the gold weather
or you have your Axemen ticking.
That way you will actually gain points by playing a spy!
Be careful with your Skjall in your round 3 mulligan or he may end up as a dead card.
Don't forget that Skjall can either pull Udalryk or Iris, so Mulligan one of those if you are
in danger of drawing into Sjkall.
Those were just some general tips, but adapting to each matchup is key for this deck, so let's
go through each of them in detail.
Alchemy Mulligan away your Axemen.
All of them, because they won't survive the Viper Witchers.
Your machines and weather will win this for you, especially if your enemy can't high roll
into weather clear from runestone or Black Blood.
And even if, then you just throw more weather at them!
Since they need to play Mahakam Ale, they won't row stack, making it even easier for
your weather to hit.
Be careful with Iris though, because they can buff her up with Swallow or use Vilgefortz
to trigger it before you want her to be triggered.
Reveal Like Alchemy, don't focus on your Axemen to
much, since they can get rid of it with Scorpions and Mangonels.
Typically Reveal also plays Scorch and Yennefer: Enchantress or Villentretenmeth for double
Scorch.
This is why I would try to play Axemen after they are most likely to stick, like when you
already established a Skellige storm, so the enemy needs to make use of their scorching
effects in round 1.
Keep Iris for round 3 and do a decent value push there, because, without the Scorches,
they won't be able to create that much power anymore.
Greatswords The bad news: your weather may be soaked by
their Greatswords.
The good news: Their ships will trigger your Axemen!
This matchup is really a love-hate relationship.
Mulligan your gold weather, because Greatswords will soak most of the damage and you don't
want to trigger his engines for him.
Skellige Storm, on the other hand, is good to have, because as soon as he lined up units,
Skellige Storm will still be able to deal 3 damage per turn, as long as the first unit
it hits is an enemy longship!
Play your Axemen early (even before weather), then apply Skellige Storm and use your Whalers
to pull units into the storm, while breaking up the Longship - Greatsword combo.
It may look like you can catch up with your enemy, but don't forget that they have Coral
and Mandrake, while you have no removal at hand.
Therefore getting that out of your enemy's hand in round 1 is very helpful.
Don't rely on Axemen as your finisher, because you may not get good targets to hit with Harald
(like Greatswords that reset).
Instead try to go for the Restore into Captain, etc. into Iris combo.
If Coral has not been played you can also bait Coral with your Iris, so you can deploy
Axemen afterwards.
Boats It's like Greatswords, but this time your
weather actually will provide you value!
Bran is most likely to start off with carryover, so I would dry pass to avoid going down a
card.
Since Bran does not run weather clear, you can be sure that your weather will stick,
so get Axemen out and get that card advantage.
Also, Bran really does not like short rounds, so it's all about winning the long one.
However, don't forget that one Axemen will be Coral'ed, so don't risk anything and better
get all available Axemen out.
Veterans Like Boats, they do not run weather clear,
so it will generate quite some value for you.
The difference to boats is, that they are actually really good in a short round and
they don't really care about round 1 length, they even embrace a medium round, which is
just enough to setup their graveyard.
Since they are not playing Spy, fully commit to round 1, use your Spy to turn the colour
of the coin in your favour and win it, so they don't bleed you with a semi-long round
2 and short round 3.
Henselt Dethmold may clear your weather, but he can
do so only once, so get it out asap, because another benefit is: the more weather you play
in the beginning, the fewer units will become targets for his machines.
Henselt typically row stacks, so wait until you see which row he commits to, get the Skellige
Storm out, deploy your Axemen and use Warships so they survive.
Be aware that Henselt runs Scorch, so create a decent point gap between your Axemen or
your enemy will use their machines to line them up for a double scorch, which will cost
you the game.
If Scorch is out, you can play Iris as your first card in round 3, further denying machine
targets, before you setup your board with Restore and co.
Coinflip Elves Your weather may stick or not, which depends
on if they are able to use Brouver to get Ida and how lucky they are with getting weather
clear from Elven Scout or Doppler.
Use your Ships to kill off their Elves or to pull them into weather and pass before
they are able to play their Vanguards for insane value.
It may be tempting to just over roll them with badass Axemen and weather that stuck,
but keep in mind that Shirru is in the deck, so consider that, before you commit to the
round.
Shupe It's the same as Coinflip elves, but with
less ability to clear your weather and less power in a long round.
Commit to a long round and hope that Shupe won't get the option they are looking for!
Don't forget they run Shirru and possibly Elven Archer and Wardancer, so stagger your
Axemen in a way, that you prevent the double Scorch.
Moonlight Moonlight is the only deck, where I would
hold back my weather, to override his as soon as he plays it.
Even if he does not play moonlight, because he is afraid of your weather, you already
are denying them a lot of points!
Play your Axemen and use Warships to buff them, while avoiding row stacking too hard,
because he may switch to offensive weather and Blood Moon will punish you for a full
row.
Deathwish Their Cyclops is able to destroy a friendly
unit and deal their power in damage, so try to play your axemen, before they can utilize
an 11 power unit or your spy for 13 damage.
Early Axemen also make sense, because Deathwish have some high tempo plays like Griffin into
Dao and it may be hard to compete with that if you have no Axemen on the board.
Skellige Storm on rows with Dao's is great because it won't run out of targets this way.
Okay, enough of the matchups, let's head into an example match!

 For more infomation >> WHO IS BTS ? (2018) Guide for new ARMYs (vostfr en cours) - Duration: 23:49.
 For more infomation >> Swimming with Dolphins in Akaroa – New Zealand's Biggest Gap Year – Backpacker Guide New Zealand - Duration: 7:01.
 For more infomation >> DER STANDARD-Guide zu den Amadeus Awards 2018 - Duration: 3:00.


 For more infomation >> Narrowboat Simulator: Controls Guide - Duration: 5:20.

Không có nhận xét nào:
Đăng nhận xét