0.5cm ~ 1cm
Thứ Bảy, 30 tháng 9, 2017
Auto news on Youtube Oct 1 2017

-------------------------------------------
Toyota Avensis Wagon 1.8 VVTi Luna Business - Duration: 0:57.
-------------------------------------------
Toyota Yaris 1.3 VVTi Aspiration Automaat - Duration: 0:58.
-------------------------------------------
Toyota Aygo 1.0 VVT-I X-PLAY - Duration: 1:01.
-------------------------------------------
Toyota Yaris 1.0 16 V-STRBK-BJ 2000-APK 01 NOV 2017 - Duration: 0:49.
-------------------------------------------
Toyota Yaris 1.0 VVT-i Aspiration 5-deurs | Airco | Camera | Bluetooth - Duration: 0:54.
-------------------------------------------
Toyota Land Cruiser 3.0 D-4D VX | Navigatie | Trekhaak | Climate | Handels-/meeneemprijs - Duration: 0:59.
-------------------------------------------
Toyota Aygo 1.0-12V Comfort | Airco | CDV | Elektrische ramen - Duration: 0:59.
-------------------------------------------
Toyota Yaris 1.8 VVTi TS - Duration: 1:01.
-------------------------------------------
Toyota Yaris 1.5 Hybrid Lease, Navi, Camera, Cruise Control - Duration: 1:00.
-------------------------------------------
Toyota RAV4 2.0 Executive Business 4WD Automaat! JBL, Trekhaak Leder, Navigatie, JBL Sound - Duration: 0:54.
-------------------------------------------
Toyota Prius Wagon 1.8 Business Navi, Camera, panodak - Duration: 0:54.
-------------------------------------------
Toyota Tundra 5.7 V8 Double Cab - Automaat - LPG-G3 - Grijs kenteken - Duration: 0:54.
-------------------------------------------
Toyota Prius 1.8 COMFORT Navigatie, climate control - Duration: 1:00.
-------------------------------------------
Toyota Aygo 1.0-12V 5 DRS AIRCO/ EX BTW - Duration: 1:01.
-------------------------------------------
Toyota Auris Touring Sports 1.6i Dynamic / Navigatie - Duration: 0:57.
-------------------------------------------
Toyota Aygo 1.0 12v 5 deurs Airco lichtmetalen velgen - Duration: 1:01.
-------------------------------------------
Toyota Verso 1.6 VVT-i Aspiration | Panodak | PDC V+A | LM-velgen | - Duration: 0:59.
-------------------------------------------
Toyota Aygo 1.0 VVT-I X-SPORT X-Shift Automaat, Lage Km! - Duration: 0:59.
-------------------------------------------
Toyota Avensis Wagon 1.8 VVT-i Dynamic Business | Automaat | Navigatie | Parkeercamera - Duration: 1:00.
-------------------------------------------
Toyota Yaris 1.3 VVTI ASPIRATION - Duration: 1:00.
-------------------------------------------
Auto news on Youtube Oct 1 2017
One Sunday, a friend and I decided to go on a short hike to the crater of Taal Volcano.
The trip to the Southern art of Manila
to Talisay, Batangas was almost 2 hours
and yes, Taal Volcano is located in Talisay , Batangas
but a good view of it is seen from the cold city of Tagaytay
since the crater in enclosed in a lake
a boat ride is necessary which cost about P2000 for roundtrip
Good morning!
so we've just been on a 20 minute boat ride
from the other side of Talisay
and now we are here at Pulo, Talisay
So right now, we just need to register
before we begin with our trek
Hello again guys!
So we've already started our trek
I am here with my guide, Adrian
So, as per advise
the trek will take us to about 45 minutes to an hour
and then
right now, the trail is still all flat
but some parts (a few) will be steep going up
I hope I can make it
Because I'm not really a hiker
I'm just trying to be a hiker now
I'll just see you there
Yes, there's a store
and guess what I saw
there's beer
are they sweet?
we stopped here for a while at a cottage
because I can barely catch my breath
so five minute rest
then go back to walking there again
We are getting near the top
this is the final leg of our trek
it's a bit steep
I hope I can still make it
after an hour trek and unlimited sunburn
we are finally here
For more infomation >> A Guide to Hiking Taal Volcano (Cinematic Vlog) - Duration: 5:52.
-------------------------------------------
18 Relationship Mistakes to Avoid Before it's too late full guide | animated video - Duration: 10:09.
18 Relationship Mistakes to Avoid
No.1, Not taking time for yourself and being too co-dependent.
If you spend every waking moment with your significant other, you will ultimately lose
who you are as an individual.
Things like going to the store on your own will be hard and you will find yourself consulting
that person for every small decision you make.
Take some time to do what you love.
Have your own hobbies, interests and friends.
You will both benefit from this and have a richer life as a result
No.2, Saying "nothing is wrong".
Some issues or insults can seem so obvious that you can't imagine your partner not
realizing they did something wrong.
So rather than discussing the problem, you stay silent and sulk about how they don't
seem to care that you are upset.
When asked, "What's wrong?" it's so much easier and less painful to say "nothing."
It's a momentary band-aid, but the problem remains.
You either stay angry and resentful, or you move on and sweep the unresolved issue under
the rug, which only gives it the opportunity to arise days, weeks, or months later with
even greater ugliness.
No.3, Losing the romance in the relationship.
Losing the romance in the relationship is one of the key reasons why relationships fail.
It is easy to become complacent and slack on making an effort for romance.
The truth is, relationships are work.
Not that you won't have any fun along the way, but you need to remember it takes a focused
effort to be romantic with your partner.
No.4, Comparing your partner to an ex.
The human mind naturally looks for patterns.
When we experience a situation that's even remotely similar to something from our past,
we draw conclusions based on that past experience.
This is how we improve our lives and learn, after all.
But when it comes to relationships, this logic can be detrimental.
For example, let's say your ex took a long time to return your calls when he or she was
losing interest in the relationship.
Lately, your current partner hasn't returned your calls quickly.
Conclusion: Your current partner is no longer interested in you.
Wrong!
Fight your brain's addiction to patterns and remember that every single person and
situation is unique.
This is not to say you shouldn't learn from your past or set standards for yourself.
Rather, keep an open mind and afford each person a clean slate.
One final note: Never, ever say to your significant other, "My ex did that all the time."
Comparing someone you care about to someone you don't is incredibly hurtful.
No.5, Forgetting to appreciate your partner.
Lastly, never forget to tell your significant other, "thank you", or "I love you."
At the beginning of the relationship, you surely noticed all of the kind things that
he or she was doing for you, and praised him or her accordingly.
You said you loved each other all of the time.
Sometimes we forget how awesome the other person is, until we think about it.
Tell your significant other right now how you feel about them!
No.6, Holding back.
Give generously to your partner without expecting your kindness to be returned.
Don't be afraid of loving too much.
Women, especially, often fear that showing too much interest makes them seem needy or
clingy.
If you want to be cautious at the start of a relationship, that's completely understandable.
But once you're both in it for the long haul, give as much as you can.
If your significant other shows affection less openly and often, resist the urge to
match their ways.
Instead, communicate with your partner about how you need to receive love.
Expressing love and showing kindness, will never serve you wrong.
No.7, Keeping secrets from your loved one.
This is something that goes along with keeping communication open—do not keep secrets.
Not that you have to tell the other person every minute detail about your life, but you
should not intentionally keep something major from them.
You know it is a secret that needs to be shared, when you feel even slightly guilty for not
telling them.
It will come out eventually, and sooner is always better than later.
No.8, Not talking about money.
Money is always a tricky subject.
You might have come from different backgrounds.
If one person grew up wanting for nothing and the other has always had to pinch pennies,
there may be some disagreements over how money is spent.
If you are in a serious relationship, even if you have separate money, be sure to discuss
these things as money issues are guaranteed to come up eventually.
No.9, Threatening to break up This is a dangerous mistake that places a
dark cloud over relationships long after a heated argument has passed.
The most fundamental part of a mature relationship is remaining committed in the lowest of times.
By threatening to break up, even if you're saying it out of frustration and don't really
mean it, you're abandoning your partner in a cruel and cowardly way.
You're basically saying, "I'll love you until" or "I'll love you only if."
Threatening to break up is a selfish power play that benefits neither person.
Avoid playing that card at all costs.
When emotions have cooled, you'll be so glad you did.
No.10, Not taking differences in core values seriously.
Even though you like the same music, and enjoy spending time with one another, you will still
have a hard time getting past major differences.
Core values include things like religion, morality, and the importance of things like
family, friends, careers and money.
Take some time to discuss these things, before you move your relationship forward, or you
might be in for disappointment later.
No.11, Fighting about everything.
On the opposite end of the spectrum, do not make everything an argument.
Think about all of the problems you have with your partner, and really consider whether
these are deal breakers, or if you can build a bridge and get over them.
No.12, Constantly questioning your relationship.
Do you sit around wondering whether you, and your partner will still be together next week,
next month, or next year?
Do you take signs of preoccupation expressed by your partner, as evidence of his or her
disinterest in you?
Questioning your relationship means that you doubt it will last, and therefore may be less
likely to feel comfortable about commitments you make about the future.
If you're always looking for a "Plan B," your partner may sense this, and the relationship's
future demise could then become a likely prospect.
No.13, Being too clingy.
It's understandable to want to spend a lot of time together at the beginning of a relationship,
but if you want things to last, and continue along in a healthy manner, give your partner
their space.
Calling and texting multiple times a day, and trying to make daily plans can seem like
overkill.
Remember that you have a life of your own, and it's much healthier to give your partner
their space.
No.14, Getting too serious, too fast.
Even if he or she seems like "the one", and you can picture your future children,
pets and house where you'll throw backyard barbeques, take a second to step back and
chill out.
Getting too serious, too soon can put a lot of unnecessary pressure on a relationship,
and has the potential to scare off your partner.
No.15, Trying to control.
Many of us either have control issues, or things that the other person does that drive
us crazy.
Both of these scenarios can lead to us wanting to control, or comment on every move the other
person makes.
Think about it though, would you like someone telling you what to do every waking minute?
You are not this person's parent.
If he or she is a grown adult, treat them like one.
No.16, Getting jealous for no reason.
Jealousy can put an immediate damper on relationship, especially if it's in no way warranted.
If you find yourself getting jealous every time he or she checks her or his phone, or
feeling the need to question where she or he is, and who she's or he's with minus
any proof of wrongdoing, you could end up pushing your partner away.
No.17, Expecting perfection.
We are all human.
We all make mistakes.
Do not hold your significant other to some unrealistically high expectation.
This is especially hard for those of us who hold unrealistically high expectations for
ourselves, but that's another topic altogether.
No.18, Trying to change the other.
Seeing your partner as an improvement project is a recipe for disaster!
No one likes to think they need to be fine-tuned or changed.
Needless to say, it gives the impression that they are not quite good enough.
If that's the case, why are you with that person?
the Solution is to Remind yourself that no one is perfect, including you.
Appreciate your partner's good qualities, and if somehow you are hurt, or offended by
certain words or behaviors, communicate it kindly and positively.
Seek to inform rather than criticize
-------------------------------------------
Tiger 1 Review with Guide - World of Tanks Blitz - Duration: 5:54.
Welcome to a new video.
Today this is my first Guide with a review.
Of course at first the review. From the great Tiger 1.
It has normally 1450 HP.
I have 75 Hp more because i have equipment.
It has 100mm at the front, 82mm at the sides and 82mm at the rear.
Same stats at the turret.
It is 57 tons. 819 PS.
The max. speed is 44 km/h.
Traverse speed is 41.72 deg/sec.
24.30 deg/sec with the turret.
Between avg 165-275 dmg.
10.18 rate of fire. That is pretty good for a Tier VII Heavy.
My reload is 5.9sec with the 8,8cm. The Tier VIII Gun.
Aiming time is 4.4
With AP it has 203mm pen.
APCR/Gold 237mm pen.
HE 44mm pen.
220 avg dmg.
From my experience it made between 200-210 avg dmg.
With Gold it makes a bit less dmg.
With HE it makes of course more dmg. (Just on bad armored tanks)
This is a really short review from the Tiger 1.
I'll show you now how to play with it.
This was a battle on Naval Frontier.
This was a Mastery.
I want to show you how i played it here.
I drove trough the mid.
What i expected from our lights/meds that they drive on the light line.
Below C when you look at the minimap.
My plan was to drive to C and to cap it.
Before the enemies come.
When they will come up there we're gonna defend it.
Me and my mates in the C cap will make a little mistake.
Look on the C cap points.
One guy drives back to early. I thought it's done that's why i back up too.
Now we got C.
I stayed there to put a shot into the T69.
Just show your turret.
Our bulldog stands in the way.
I have to go down to support our T-44.
That's why i rammed him out of the way.
Now i'm driving to him.
Go with the Tiger 1 always at the front. Not at the second or the third.
*not important*
Because i know i'm reloading faster than him i'm staying there.
Fire and immediately drive back. So he got no chance to shoot you.
Always check the minimap. (You should do that in every tank btw).
Someone from the enemy team got B and A.
Look at what i'm doing. I'm sidescraping. So he can't pen me.
He shows his fron to me so i can pen him. He doesn't know i have enough pen to shoot trough.
And again he shows his front to me.
Sidescraped everywhere.
There he managed to pen me. Maybe he loaded gold or he shot trough my tracks.
Now i'm pushing because i know he won't come out again with low HP.
After that i'll drive to B and cap it.
He managed to shoot me again.
No, i don't think he loaded gold because he didn't made much dmg in this shot.
There i hoped that the T-43 will come to me.
Now i'm driving to B.
Look at how i play.
If you want to see other tactics with the Tiger 1 check other Tiger 1 videos out. Like mastery's etc.
Or you can watch my older videos about the Tiger 1.
My fav tank^^
Because i know he will come from there, i'm backing up to get more time to cap B.
There he is.
Activating adrenaline because this tank is really dangerous.
I think he got the stock gun. (Stock gun has 1.3sec between the 3 shots).
I forgot what the gun was called.
Playing really offensive.
It's not hard to play it like that. It just takes time, experience and training.
This was a pretty good battle to show that as an example.
I made...
Almost 3K dmg and 2 kills.
Play it like that.
If you have specific questions about the Tiger 1 go ahead.
Like what should i do when my team has more heavies and i'm in my Tiger 1.
Just write it in the comments.
See you next time! "Haut rein" ;)
-------------------------------------------
Beginners Guide to the FZ300/330 Part 5 - Filters and Close Up Lenses - Duration: 15:50.
Hello I'm Graham and I hope everyone's having a great day and welcome to the
fifth part of this new series I'm running for new users to the Panasonic
Lumix FZ300/330 camera now. In today's video we're going
to be looking at the use of filters and close-up lenses with the camera. It's a
question I get quite often on my Photographic blog, the choice of
filters, which type to use, which situations would use the filters and for
close-up lenses which would be my recommendations for the type of filter
for macro and close at work. Let's begin by looking at probably one of the most
controversial filters - and that's that UV filter. Now the UV filter has its origins
back in the days of film. Film emulsion has a high sensitivity to UV light and
if you shooting landscapes for example you may notice that the distant hills
would turn blue because of the amount of ultraviolet and the water vapour so we
used a UV filter which would eliminate that blue cast to the image. But with
modern digital camera sensors, the sensor itself has both infrared and ultraviolet
absorption layers in front of it so there's absolutely no reason to fit UV
filters to the camera. Now this is where the controversy comes in some people say
that it's a good idea to fit these to protect the front element of the lens
and other people say no, if you do that you're going to degrade the image
quality and you lose a low contrast and you're not actually going to protect the
lens at all. Now I'm of the school that says only fit the filter in an adverse
situation - such as if you're at the seaside and you've got the chance of
salt spray contacting the lens or you perhaps at Motorsports where there's a
chance of flying debris coming hitting the lens but in normal circumstances I
would recommend that you don't fit the UV filter. If you are fitting the filter
make sure the camera lens is scrupulously clean before you fit it and make sure
you clean both the front and back surface of the filter otherwise when
you're in the wide-angle mode you might even see dust on the front surface of
this lens. When you're in that wide-angle position especially if you're shooting
towards the light the camera with his closed focus ability will show you that
dust on the film on the front of the lens. The best form of protection is in fact a lens hood and the number of people I see
carrying cameras around that don't use a lens and it's amazing it's there to
provide both the functionality of protecting the front surface of the lens
and to shade the lens from stray light. So once the lens hoods installed you're
not likely to impact the front face of the lens and in most cases it's going to
shield the light from hitting the camera lens giving you ghosting and flaring and
loss of contrast - so always use your lens hood - It's there for that purpose. If you
are going to fit the UV filter I say clean front and back surfaces screw it
onto the lens and then replace your lens hood. It's not a good idea to stack
filters so if you're going to use say the circular polarizing filter -we're going
to talk about next - you must remove the UV filter before you fit the circular
polarizing filter otherwise you're introducing too many glass to air
elements and the risk of ghosting and flaring the loss of contrast is even
more severe. So let's now look at the circular polarizing filter. Now the
circular polarizing filter is there to reduce reflections in natural light. It
doesn't work in artificial light so it's no use trying to use them indoors to
take reflections off pictures and mirrors etc it won't work but if you're
in natural light outdoors it can reduce the reflection. But there is a caveat as
well - it only works when the light is between 90 degrees and say 45 degrees to
the camera axis. If the sun is back over your shoulder and you're trying to
photograph something you won't see any reduction in reflections at all. Here's a
demonstration clip that I shot. The light is directly over my shoulder and I'm
rotating this circular polarizing filter through 360 degrees and you notice
there's no reduction in that reflection on the leaves. Turn to another situation
where the light is now coming at 45 degrees or between 45 and 90 degrees to
the camera and you can see that as I rotate the filter I can totally
eliminate those reflections from the leaves or the water behind in that case.
So you can see when the light is at 45 or 90 degrees to camera I can totally
reduce those reflections from the leaves or
shooting water you can see that I can reduce most of those reflections from
the water. So the circular polarizing filter screws into the front element of
the lens and then you can rotate it while you're looking through the
viewfinder to see when that cut point appears. Now it's probably impossible to
fit the circular polarizing filter and the lens hood at simultaneously because
you need to get your hands inside to adjust that front rotating ring. So once
that's in there "A" you can't install the lens at afterwards and if you install
the lens hood and then try and install the filter you see you can't get your
fingers in there to adjust the front element so it is a situation where
you're going to be using the camera without the lens hood. So again the
chances of ghosting or flaring because of light striking those glass surfaces
is very much increased. Don't be tempted to try the linear polarizing filter
which again has its origins in the film days. Linear polarizing filter may upset
the way that the camera autofocuses so always choose the circular polarizing
filter for your polarizing needs. Now let's look at another variant to the
circular polarizing filter and it's the neutral density filter. Well the neutral
density filter comes in two varieties one is the variable type and this one is
a variable ND filter. It's basically two polarizing filters - one is fixed and one
rotates and by overlapping the cut angle of each other filters you can actually
totally eliminate the light coming into the camera. Again there's a problem with
that - as you start to go to the maximum densities you do see a colour shift
appearing or in some severe cases you'll see an X appear on the image where the
two polarizing faces cross over. So you can only use them from the minimum to
about three-quarters of the ability to reduce light - but they're useful
especially in video to get you the correct frame rate but I'll talk about
that when we do the video section of this tutorial.
The other filters are the fixed neutral density and this one is the
Hoya Pro ND 200 which is an 8 F-stop filter so that reduces the amount of
light reaching the sense of by a factor of 8 f-stops so it's ideal for shooting
things like running water where you want to create those soft dreamy flowing
water scenes or if you're a seaside you wanted to create a very still looking sea.
Long time exposures are created by using the neutral density filter. If you wanted
further light reduction you could use the Hoya Pro ND 1000 and the Hoya ND
1000 is a 10 stop reduction in light so where the Pro ND 200 is effectively eight
stops reduction the Pro ND 1000 is 10 stops - so it gives you an extra two stops
of light reduction if you wanted to create super long time exposures - so the
reason for these is to extend your shutter time to give you those long time
exposures. With some of these filters there's also the possibility of a colour
balance change especially if you use in the darker filters say the ND 8. You'll
find that you get a colour shift normally towards a green or some cases towards
the magenta dependant on the dye set that's been used with the filter. So it's
worth buying a good filter for both optical quality so you don't get any
reduction in optical quality and "B" the color balance stay neutral as you
use the ND filter. You can of course use a manual white balance to try and reduce
that it may help in some circumstances, I've used the welding filter which is
about 10 stops and again by using manual white balance I was able to get a
neutral picture by using that manual white balance setup in the camera.
Now a variation of the neutral density filter is the use of what are called
graduated neutral density filters. Now to use those you need the adapter to go
with your camera so that goes from the 52 millimeter thread to the 100
millimeter square filter holder. Most of this operation you could do in
post-processing. If you use neutral density filter in something like
Photoshop or Lightroom you can create the same effect but if you don't want to
do any post-processing and you wanted to reduce the amount of burnout in skies
for example you can use one of these neutral
graduated filters. So they clear at the
bottom and they've gotta then a variable graduation from nothing up to a fixed
amount of density so you can slide this into the filter holder and with the
filter holder on the camera you can look through the viewfinder and see at the
point of which you starting to cut off the the amount of light in the sky. It's
ok if you've got a level horizon but sometimes if you've got mountains and
valleys you notice that the graduation darkens the mountains and it looks
slightly artificial. So in those sort of situations is better to create a mask in
Photoshop and then reduce the sky without reducing the mountains. But these
are useful if you wanted to stack things like neutral density and fixed density
so your making long time exposures and your shading down the sky you can
use two filters slight together they're very close together so you don't get vignetting
and with a hundred millimetres frame you don't see any vignetting even
at the wide-angle setting. So if you really want to improve your landscape
photography you might want to consider using the hundred millimeter square
filter holders instead of the circle ones. Now let's look at close-up lenses.
Some people refer to them as close-up filters because it actually 52
millimeter threaded and this screw onto the front of the camera so hence the
name close-up filter. With close-up lenses there are two notation systems -
one is the diopter and your probably gets sets of number one number two number
and some systems even include a number ten which is quite a high magnification and
other systems use the "D" designation. So in fact this one here is the polaroid
250D and that gives a four times magnification so there is a number 500
which gives you two times magnification but the 250D is the one I normally use
as that gives me a nice magnification ratio and a suitable working distance to
my subjects. Now there are two types of lenses one is the single element lens
and the other is called an achromatic lens.
Now the achromatic lens is actually two lenses or three lenses bonded together
to reduce some of these defects that you get with a single element lens - with a
single element lens you get distortion around the outside edge
and sometimes you get what's called colour fringing or chromatic aberration where
the lens can't focus the three colors of red green blue to the same focus point
so you end up with color fringes so it's best if you are going to get into
close-up photography to choose what first of all an achromatic lens so this
is a sigma a chromatic lens quite an old lens but still a very good sharp
close-up lenses. They're very difficult to find now so the hence the reason for
choosing the Polaroid 250d lens as a substitute for it again that's an
achromatic lens 52 millimeters and it screws into the front of the camera and
gives me that four times magnification
Another system is the Raynox system And the Raynox system comes with its
own mount system so the Raynox has a adapter which will fit most cameras from
52 millimeters up to 62 millimetres and it just simply clips into the lens
thread of the camera and then you screw the particular lens that you want into
their adapter. Now that is fine it works well but there is a possibility that you
might just catch the tub and push it off and also if you don't get it on square
you could end up with a part of your image being in focus and the other not
so I tend to not use the supplied adapter but you step up rings from the
43 millimeters that the lens has up to 52 millimeters I've adapted from 43 up
to 52 and then that screws on to the front of the camera like so - and that
keeps the lens nice and optically centered and it's parallel to the film
plane so you don't get any shift in focus or optical shift in the axis as you
screw the lens on. Again they're available in two strengths the 150 and
the 250 if you're a new user to macro photography that 150 is much easier to
use than to 250 and it gives you a little bit more depth of field so if you
are struggling to get depth of field in macro shots and you don't want to use
stacking technologies to produce multiple images and stack them
to one image then the 150 is a good starting lens gives you a nice working
distance to your subject and gives you a reasonable amount of magnification. Now
I'm going to put a link to a page of my blog where I set out the magnifications
and the amount of subject to camera distance that you expect to achieve on
using these close-up lenses on that chart you'll see the various focus
distances you can achieve when you've got the camera set to infinity and when
you've got it set to its closest focus point you'll see the distances you've
got the camera to the subject so dependent on the type of photography
whether you're shooting insects or flowers - you judge the amount of magnification and
the distance you need to be from those charts on that blog page. So hope you'll
go and have a look at that and decide which lens to use. In terms of optical
quality there's not a lot of difference between the Raynox and the Polaroid
system you do suffer from vignetting up to x 4 with the Raynox lens if you look
through the back of the viewfinder when you first install it you see there's a
very dark circle and you've got to zoom out to about x 4 to enable you to move
past that vignetting point if you use the 250 d you can use a camera all the
way from 24 millimetres all the way up to 600 millimetres to get the required
magnification without any vignette in from the lens itself. So hopefully that's
given you some insight introduced of filters and close-up lenses with this
camera and have a look at the photographic blog there's a lot more
information on filters and close-up lens there and I'll put links to those in
the video description below. Now the next video is going to be on shooting video
with the FZ300/330 will be quite a long program - there's a lot to talk about
recording sound with the video it's likely to be about three weeks before I
can gather ready because I'm into the middle of a very large DIY project at
home and it's going to take me about another two weeks to be able to complete
that before the weather starts to get too bad here in the UK. So hopefully I'm
going to get you that video within the next two to three weeks depending on the
weather outside etc. So until the next one thanks again for watching if you're
new viewer to the channel please check out the previous
four of the videos. There will be a playlist in YouTube so you can actually look at
the previous videos - so until the next video thanks very much for watching
please do take care and I'll see you all in the next one.
Goodbye for now.
-------------------------------------------
Allen Edmonds Shoe Polish Color Guide | Saphir Medaille D'Or - Duration: 19:11.
Hi I'm Kirby Allison founder of The Hanger
Project. In today's video,
I'm going to show you how to match the perfect
Saphir Medaille d'Or shoe polish color
to your pair of Allen Edmonds dress
shoes. One of the most frequent questions
we receive here at The Hangar Project is
what color shoe polish should I use for my
Allen Edmonds?
Now we received that specifically for Allen
Edmonds because it's one of the most
popular
and certainly most important shoe
companies here in the United States still
manufacturing high quality
fully welted dress shoes
in America.
For the money, about $395
for these dress shoes we have here.
You really can't beat it.
And one of the things that I always say is that
if you're looking to really invest
in a proper dress shoe that's going to last
years if not decades;
you really need to be at the Allen
Edmonds quality level
or better. The full 360
degree Goodyear welting means that you
can resole your shoes as often
as you need to.
And Allen Edmonds uses a really high
quality upper leather that
is only going to look better
with time
and only going to look better
with proper polish.
If you have any questions
or comments during this video,
please ask them in the comments section
below. Let us know what you think.
Do you wear Allen Edmonds?
What type of Allen Edmonds shoes do
you have? And then if you had any challenges
choosing the proper color shoe polish
for your pair of AE's.
When selecting your shoe polish color
it's important to understand that there's never going to be
a perfect match.
I mean with the exception of black it doesn't
matter how many different shoe polish colors
you have.
You're not going to be able to find the perfect
pigmented cream polish
that is made for the pair of
shoes that you have.
The reason is is that there are so many different shoe
manufacturers out there that
a medium brown
or a light brown from one company to another
is never going to be the same.
And even
with the same shoe it's never going to be the same.
Allen Edmonds for instance hand applies
all of their finishes,
so if you pull out five different pairs
of Walnut Allen Edmonds
shoes,
most likely each of those shoes
is going to have a slightly different finish
and that's one of the things I really love about
a high quality pair of shoes.
Part of the magic of polishing your
own shoes is to see how that finish,
the patina,
evolves over the lifetime
of the shoe as you put more
polish into the leather.
And choosing your shoe polish color,
you really have an opportunity to make
a decision as to what direction
you're going to take that finish so that those
shoes are really personalized to
you.
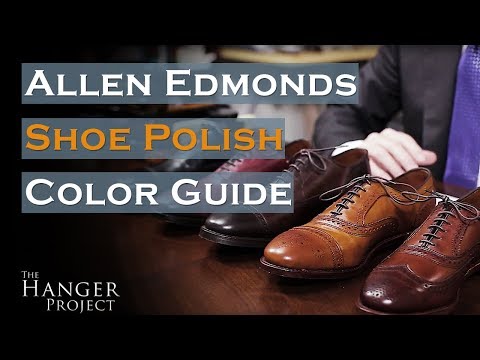
I have a pair of Allen Edmonds dress shoes
in each of the five most popular
finishes that I think
that anyone should consider.
Now these are the most kind of traditional
conservative finishes that you're going to find
on all of Allen Edmonds most popular
models.
Of course we have Black
and then we have Oxblood,
Brown,
Walnut and Dark Chili.
5 beautiful finishes
and really you couldn't go wrong
with a pair of Allen Edmonds shoes in
any of these colors.
The first pair of dress shoes I bought in college
was a black pair of Allen
Edmonds Park Avenues.
This cap-toe Oxford is certainly one of the most
traditional formal dress shoes
that you can buy.
And then the color black,
you can wear it for anything.
You can wear it during the day,
you can wear it at night,
you can wear it to a wedding,
a funeral or to your first interview.
So if you're only going to buy one
shoe, this is the shoe to
invest in.
Now Black is easy of course you're going to use
a black shoe polish.
Now what's great about the Saphir
Medaille d'Or black polish
and as you can see here
is that again it has
such a high concentration
of pigment in it that you really
get great saturation of the
finish itself.
Even though if you're buying a pair new
from the factory, I absolutely
recommend polishing them first.
We have a video on how to shine a new pair
of shoes.
There is no polish
or actual finishing on a pair of shoes
straight from the factory.
So if we were to polish these
with a little bit of cream polish
and then buff it off you would actually see
a real nice shine begin to develop.
Also the waxes in both the cream
and the wax polish are going to help protect
the leather
and just give it that,
that finished look of a
well cared pair of shoes.
With black, of course I'd
recommend a black polish.
Next, I have a pair of Park Avenues in
Oxblood. Now Oxblood is a beautiful
finish that combines red
with a little bit of black to create
a deep kind of burgundy
that has visual interest.
Right. It's got color,
but it still means business.
It's still formal So there's several
different color polishes that you could use
here. And once we get away from
Black into some of the other finishes,
we're really going to see how different polishes
can take the shoe in a different direction.
First is Hermes Red.
The second color is Mahogany.
And then the third possible color you could use
is Burgundy.
Right. Now each of these three
polishes are going to take this shoe
in a little bit different direction.
So let's take a look
at how that would work by smearing
the polish on a little bit of white paper.
I like to take a pigmented polish
and smear it on paper
because it allows you to really better
see the pigment
in the polish and where that would take.
Hermes Red
has more red in it.
Mahogany is more of
the Brown family.
It still has some red,
a little bit lighter of a red than the
Hermes Red and is probably a little bit closer
to brown. And then last is
Burgundy.
Burgundy absolutely has
very strong hints of purple.
So first I'm starting
with the Burgundy
and the Burgundy really blends
into
the Oxblood quite nicely.
But again those purple pigments
are going to darken the leather
slightly so
with the burgundy polish again we're bringing
out some of those purple undertones
that you get whenever you mix black
and red. And next time going to show you
what the Hermes Red looks like.
It sounds like a strong pigment color,
but as I apply it here.
It too
blends in quite nicely.
So if you were to use Hermes Red on
these Oxbloods,
again you would be pulling out that red
finish.
It's still quite subtle,
but nevertheless looks great.
Now last is the Mahogany.
And Mahogany,
again as I said has a little
bit less red in it than the
Hermes Red
and more brown
and so of the three polishes,
this one is the one that I would say
probably least matches
this Oxblood finish.
So if you were looking to mute
the finish,
maybe you would use a Mahogany.
But of the three different pigment colors that we
have here I would say that Mahogany
actually matches this Oxblood
the least.
My two recommendations for the Allen
Edmonds Oxblood is
either the number 12
Hermes Red if you want to accentuate
some of the red in this finish
or the number 8
Burgundy if you want to bring out
the purple.
Next we have the
Allen Edmonds Brown finish.
This is the Fifth Avenue in brown.
Now the Fifth Avenue is a slightly
less formal dress shoe than the Park
Avenue because of the broging across
the cap,
but still very much a formal
dress shoe.
Now to call this Brown is really
honestly a little misleading because
this is a dark brown.
And so for this shoe the only
polish that I would recommend is going
to be the Saphir Dark Brown.
The number 5 Dark Brown
is almost a black
and as you can see from this shoe,
it is such a dark finish that
in low light it would be mistaken
for a black.
So if I smear this
onto again my swatch
card you can see
that it is almost as dark
as that black.
I mean it is a proper dark brown.
And I've got a little bit of scuffing right here.
I'm going to put this polish over
that scuff mark
and you can see that the Dark
Brown really perfectly
matches the Allen Edmonds brown
color.
Let's buff that off and see how that works.
So that scuff mark all
but completely removed
with a little bit of additional polish,
the waxes would really help completely
conceal that.
But from a pigment perspective,
any discoloration from scuffing is going
to be fixed very easily
with a good cream polish.
So here I have the
Allen Edmonds strand in their Walnut
color.
Now walnut is a beautiful
medium brown.
This is probably the second dress
shoe anyone should buy next to the black.
Everyone needs a good brown
that's not too light,
not too dark.
This to me is the quintessential brown
dress shoe. Now what's nice about the Strand
is that as you can see there's a little bit more
brogging across this.
So again it's a less formal shoe
than say this the Fifth
Avenue or the Park Avenue
which is perfect for Brown.
So,
for this shoe there's two polish colors
that I think you could use.
One is the light brown.
Now the light brown again
is slightly lighter
than the finish of this shoe.
And so you're not going to have to worry about
it excessively darkening
the leather but it still has enough
pigment in it that
if you have any type of scratching
it's going to fill that in.
And depending on what area of the shoe
you know, the light brown is either
a perfect match where
the polish saturation is not that great
or it's a little bit dark where you see
some more burnishing.
So you could also use
the Medium Brown.Now
the Medium Brown
would definitely darken this a little bit.
And if I put this on the swatch card,
you're going to be able to see the difference
in these two.
Definitely darker.
If I put it on the lighter area
of the shoe you can really see how it makes
a difference. It's going to darken that a little
bit.
But here, say on the toe cap
it's slightly less dark.
Now,
let's see.
Here is the Cognac.
You might also be able to use the
Cognac on here.
The Cognac again has maybe a little
bit too much red in it.
That's not to say that you couldn't use it you just
have to understand how that red is going to bring
the finish of the shoe you
know as I said earlier
you know choosing the correct polish
color is more of an art
than it is a science
and is a complete function of personal
preference.
You absolutely cannot ruin a pair
of dress shoes by using the wrong polish color
as long as you're not trying to use a black
on a light brown pair of shoes.
For the Allan Edmonds Walnut finish,
if you're looking to really maintain
that original finish,
I'm going to recommend the number
3 light brown.
If you're OK with the slight darkening
or if you want to introduce a little bit
of a burnishing
or antiquing affect to these Walnuts,
then I would recommend the number 37
Medium Brown.
And if you really want to play around
with the finish of your shoes you could absolutely
use the number 10
Cognac.
Here is the Allan Edmonds Dark
Chili. Now the Dark Chili is
really a medium brown to
a medium to dark brown
with a little bit of red
introduced into the finish.
It's a beautiful shoe.
It's shown here in the McAllister
wingtip which is your
classic wingtip dress shoe.
Formal
but still certainly more
visually interesting than your plain
cap-toe Park Avenue.
So for these shoes I would recommend
either the Tobacco Brown,
which would darken the finish slightly
or the Medium Brown.
Now the Medium Brown is probably the
safest polish to use if you're looking
for really just maintain
the finish of these shoes.
It blends in nicely.
It'll fix any type of scuffing you
have without unnecessarily
darkening the finish.
So let's see how that buffs off.
Now the Havana Brown is
going to be slightly darker than the Medium
Brown.
It's not going to
dramatically change the finish,
but it's perfect for
the areas of the shoe where there is a little bit
of burnishing.
And once you massage this
and smooth it out across the leather,
again
it's going to darken it slightly in the light
areas,
match perfectly in those dark areas,
but absolutely works
with this Dark Chilli.
The McAllister wingtip in the Dark
Chili is a beautiful classic shoe
that certainly is not out of place
in any classic wardrobe.
If you're really looking to darken this
and kind of further the antiquing,
I recommend the number 30 for
Tobacco Brown.
And if you just want to maintain that finish
without any risk of darkening,
then I would recommend the number 37
Medium Brown.
Here at The Hanger Project,
I really recommend the primary use
of a cream polish
and polishing your shoes.
Now most people only think of a wax
polish whenever it comes to shining their shoes
but a wax polish doesn't have the
same concentration of pigment that's
going to renew
and refinish the patina of
the shoe
and second a wax polish isn't
going to do as good of a job as a cream polish
to nourish
and condition
and to feed that leather to
keep it looking soft
and supple
and to prevent any type of drying that
may result in cracking.
The Saphir Medaille d'Or
Pommadier cream polish is widely considered
by shoe aficionados to be the highest
quality cream shoe polish out there
in the world. The reason is it
uses an all natural pine base
turpentine
and a high concentration of shea butter,
waxes and other nutrients that
are going to feed the leather
to keep it soft,
supple and to prevent cracking.
Since the Allen Edmonds shoes uses
such a high quality leather,
an open grain leather that hasn't
been unnaturally treated
or closed, it's even more
important to use a high quality
luxury shoe polish like the
Saphir Medaille d'or. Spending a little bit
of extra money on your polish will really
make a difference in how these shoes
look and last for the long term.
One of the frequently asked questions that we receive
here at The Hanger Project is what to do
with a new pair of dress shoes.
So let's just say you just went out
and bought your first pair beautiful Allen
Edmonds dress shoe.
Can you just put them on
and start wearing them?
Spending a little bit of time right when you
receive a pair of dress shoes to polish them
is absolutely something we recommend.
The reason is because no factory
that's making ready to wear shoes
has the time to actually hand
polish a pair of shoes.
So although it's finished
the leather is dyed.
It looks great.
They haven't actually been polished
with a proper shoe polish.
And then certainly any new pair of shoes
needs their own shoe trees.
The reason is is that as you wear
a pair of shoes,
the shoe leather is going to absorb
moisture as you're flexing the
shoe, it's going to naturally
bend.
So whenever you take your shoes off at the end
of the night you're going to find that they naturally
kind of flex upward.
Now the purpose of the shoe tree is it stretches
that shoe flat so that
as the moisture begins to evaporate
the shoe dries flat
and not bent.
Second of course is lacing the
shoes.
Some shoes come laced,
sometimes the salesperson
at the shoe store will lace them for you.
But we have a video specifically
showing you how to lace your shoes
using the straight across our
barbell method,
which I think looks the cleanest on
a formal pair of dress shoes.
Another question that we receive often
here at The Hanger Project is what happens
if I used the wrong shoe polish
on a pair of shoes.
Well it's not the end of the world.
Any polish that you put on top of a
pair of leather dress shoes can easily be
removed using the Saphir Reno mag,
which basically pulls off anything
placed on top of the original finish
but is still safe to use without
affecting the original dye.
Second I always recommend first
testing the polish on a small
kind of hidden
or discrete area of the shoe
just to see how the leather is going to interact
or play with the polish that you're using
because it's always going to change
just a little bit and you can never be quite
certain of what is going to look like.
And then of course here at The Hanger Project
we sell samples of all of our polishes.
So if you want to try a few different polishes
off before you commit to purchasing an entire
jar, take a look at our shoe polish
section and we offer small
tiny samples that you can use to verify
finish. Now Allen Edmonds has
way more than just five finishes.
They've really done a fantastic job
at adding new
and interesting finishes across
their entire range.
Now these four models that
we show here are just available
in the finishes that I've shown.
But a lot of them are more seasonal collections
come in colors like blue,
green you know
beautiful different the patinas.
And so my suggestion would be to
take a look at our polishing notes
to order samples if you'd like to
and just go with what you think is going
to be the closest match.
Lastly,
if you have any questions about what
type of shoe polish you should select
for a color that we didn't cover here
or maybe from a pair of shoes from
a completely different brand.
Don't hesitate to email customer service
with a link to a photograph of the shoe
or an actual photograph of the shoe
and of course we'd be more than happy to
help coach you in selecting the right polish.
If you have any questions about
anything we discussed in this video
don't hesitate to ask them in the comments
section below.
I get back to all those questions myself
personally.
Also let us know what's your favorite
Allen Edmonds finish?
How do you shine your shoes?
Do you have any tips for us on things
that you've learned?
And then any stories you have just about
Allen Edmonds.
It's a great all-American shoe brand.
It's certainly one of the top shoes that
you can get for the under $400 price
point. And we always love to hear
about what our viewers think.
If you like this video give us the thumbs
up and subscribe to our YouTube channel
so that you can receive notifications whenever
we release our next video.
I'm Kirby Allison. Thanks for joining us.
-------------------------------------------
Orlando | Epcot – Disney Theme Park | Travel Guide | Episode# 7 - Duration: 6:11.
Hipfig Travel Channel offers DIY Travel Video Guides for more than 25 cities in
Asia, US, and Canada. If you like this video then subscribe, give us a thumbs up,
or a comment. Welcome to Hipfig's Travel Guide Series
in Orlando. Florida. Planning to visit Epcot in Orlando? Then watch this Travel
Video for free tips and insights to save you time and money. Make sure to watch
the entire video so you don't miss any tips. There are several ways to get to
Epcot. If you're staying at a Disney Resort you can take a water taxi, Disney
transport bus, or monorail to Epcot. Check with your hotel. If you're being dropped
off by taxi or private car , you'll be dropped off near a designated spot near
the entrance of Epcot. If you are taking the LYNX bus, you will have to take
LYNX bus route number 50 or 56. It will drop you off at the Disney Springs
Transfer Center or the Disney World Ticket and Transportation center also
known as the TTC for the Magic Kingdom. We recommend getting off at the TTC. Here
you go through security and then board the Express Monorail to Epcot. If you're
driving your own car, take I-4 and take exit 67. Follow the signs for Epcot and
pay for parking at the toll booth. Park your car as directed. Your parking fee
allows you to park at any of the four Disney parks and have in-and-out
privileges on that day only. After securing your, car walk to the tram
entrance and take the Disney tram to the main entrance of Epcot. Tip 1: take a
picture of your parking Lane and Row number on your phone or write it down so
that you are not looking for your car at the end of the night. The parking lot is
huge and it is not uncommon for people to forget after a long day where they
parked. We have witnessed tired parents and kids looking for their car in
desperation, so don't let this be you! At the main entrance of Epcot you will go
through security and purchase your ticket if this is your first Disney park
visit. Then go to the entry gate after you purchase your ticket for Disney. You
will have to exchange your ticket voucher for a card or MagicBand at the
ticket counter. If you are not staying at a Disney Resort
you will get a card when you purchase tickets for your park admission. You will
have the option to upgrade to a Magic Band for an additional fee. Your Magic
Band or cards will be linked to your fingerprints, name, and my Disney
Experience app account. MagicBands and cards are non-transferable and will
allow you to enter Epcot with a valid admission with your fingerprint. It will
also allow you to reserve three fast passes online through the my Disney
experience app and check in at Fast Pass entrances. We had both the card and
the MagicBand and we prefer the Magic Band as it was more
convenient and made for a nicer souvenir The first area you'll encounter in Epcot
is the Future World sections. Most of the rides are located here
Tip 2: make sure to visit Club Cool by the fountain for complimentary samples of
coca-cola drinks from around the world. It's a great place for a sugar pick-me-up
Tip 3: download the my Disney experience app and link it to your card or Magic
Band. You only need one account but you can
enter each person in your party. You can immediately sign up for a Fast Pass for
popular attractions to save time in line even days ahead of your visit once you
have the app. Tip 4: all rides are indoor so you don't have to worry about
them being stopped when the rain comes Tip 5: if you don't have a smart phone
that works in the US you can get fast passes once you're at Epcot. The Fast
Pass kiosks are located before the fountain along the main walkway which
leads to Futureworld east and west Tip 6: Epcot has a single rider line for
Test Track. This line moves faster than the standby line and doesn't need a fast
pass. If you don't mind sitting next to a stranger then this time-saving tip
is for you. Tip 7: go visit all the attractions in the Futureworld first
then visit the Showcase Plaza rather than going back and forth which is
tiring when walking. When planning fast pass times, arrange to plan attractions in
the Futureworld in the first half of the day. The World
Showcase features 11 countries with a building, a movie, or a show that
highlights that country. All cast members are from the country in which they work
which is a nice bonus. The World Showcase area is more relaxed and is
geared towards adults. Alcoholic beverages from around the world are sold
at Epcot. There are no rides in the section with the exception of the boat
which crosses the lagoon. At the end of the night the fireworks show is
presented in this section of Epcot. Tip 8: Find a bench along the water. There are
several park benches that you can sit on along the waterfront but you'll have to
reserve them at least an hour before the show. You can also get a fast pass for
the fireworks viewing area Tip 9: bring a plastic refillable water bottle with you
you can refill it with ice and water for free at any of the restaurants just ask
the servers. You can also bring some snacks like fruits nuts or chips you
will easily save $30 to $50 per person in water and snacks. Tip 10: it
often rains in Orlando, especially June to September, so pack a rain poncho
We will have a link so that you can buy plastic refillable bottles and quality
rain ponchos online before going to the park under Epcot in destination Orlando at hipfig.com
Epcot is a true celebration of human potential and technological
innovation.
Happy Travels.
Go to hipfig.com for more information or go to our
Hipfig Travel Channel on YouTube and be sure to subscribe for regular updates
-------------------------------------------
Starting a Blog Guide - How to Become a Blogger - Duration: 1:50.
-------------------------------------------
Industrial Air Compressor Rentals - Ultimate 2 Minute Guide - Duration: 0:48.
When doing a short-term project, some of our clients prefer to rent an air compressor instead
of purchasing a new unit.
If you find yourself trying to make up your mind about what kind of air compressor to
rent, there are a few key elements to consider.
The type of industrial air compressor rental depends on the work needing to be done.
If you're looking to do a few simple jobs, then a small unit will suffice.
If the work entails using heavy equipment, then a larger unit is needed.
Condition of the unit is often one overlooked aspect of air compressor rentals.
You need equipment that has been well-maintained and kept in good condition.
Are you ready to rent your air compressor?
At Reap Air, we offer a variety of compressor units.
From 5hp all the way up to 200hp.
Visit our website to browse our selection today.
Auto news on Youtube Oct 1 2017

-------------------------------------------