What's up, guys?
Welcome back to the Gaming Careers YouTube channel.
In today's video, we're going to be looking at OBS.Live,
which is StreamElements spin on the OBS Studio software.
We're going to be talking about
exactly what StreamElements is,
what OBS.Live is, as well as why some of the big streamers
are moving across to this software.
And, obviously, we're going to go through setting up
and installing the software so that you can get the most
out of it's features.
If you are new around here, I just want to quickly say
please do have a look around
at the rest of the YouTube channel.
The whole channel is dedicated
to helping you grow your livestream
with tutorials on absolutely everything you need to know.
So do subscribe and turn notifications on,
if you haven't already.
So, before we jump into OBS.Live,
I thought I would just quickly explain
a little bit about StreamElements,
who are the people that have built OBS.Live.
Because I know that some of you
might not have heard of StreamElements.
Well, StreamElements is a tool set of features
that have been built for streamers.
It's sort of a website where you can integrate
a lot of their platform with Twitch
and a lot of their platform with your streaming software.
So they have the ability to, you know,
display alerts on your stream for new followers,
new donations, bits, subscriptions, hosts,
those kind of things.
They have a chat bot which you can customize
with commands and timers, as well as some auto-moderation.
Loyalty systems, the ability to be able
to do contests and giveaways.
They have overlays that you can customize,
as well as, like, an overlay manager
where you can build your own overlays.
Song requests, leader boards, you know the kind of things
that happen with Streamlabs,
who are probably a direct competitor with StreamElements.
But some of the bigger streamers are moving across
to using StreamElements.
TimTheTatman, Shroud, and Sodapoppin, just to name a few,
have all moved across to StreamElements.
So we're going to be looking at the software.
It's the first time we've looked at it
on the Gaming Careers YouTube channel.
And, with that little explanation,
now let's have a look at what OBS.Live is.
So OBS.Live still uses the core of OBS Studio,
so you're still technically running OBS Studio,
the latest version, and OBS.Live just adds a couple
of little extra features into the software.
And there's a big focus from StreamElements
on having as little impact on performance as possible
so that the features that they build are very lightweight.
They understand how important that is for a streamer.
So there's a bit of a distinction here
between having a fork of a software,
such as how Streamlabs OBS does it,
versus this way of adding functionality via plugins.
So having a fork of a software means that,
when OBS Studio releases new features,
they're going to take some time to bring into your fork
because you have to test them.
You've made so many changes to the front end of the software
that you have to implement
some of the functionality yourself
whereas having a plugin, such as how OBS.Live works,
means that you always use the latest version of OBS Studio
and the features are just added onto the top of that.
So you're always going to get
the latest and greatest features from OBS Studio,
bug improvements and all those kind of things.
And OBS.Live just adds a few little features on top of that
that are super lightweight and easy to run.
This is particularly useful for those of you
that are very comfortable with OBS Studio.
You make use of some of the plugins
that are already available for it,
such as, you know, the NDI plugin or any of the others,
but you still want to be able to manage all of your stream,
you know, your chat and your alerts,
from within one window.
That really is the focus for OBS.Live,
and today we're going to be having a look.
So the first thing that you want to do
is to click the link at the top
of the description down below.
That will take you to the latest version of OBS.Live
from StreamElements where you can then download it
for Windows.
Download and start going through the installation
as you would with any other software.
At this point, you'll be given the option
as to whether or not you want to also install OBS Studio.
If you've already got OBS Studio installed,
then you don't need to re-download that,
so you can just click install.
But, obviously, if you haven't yet downloaded OBS Studio,
tick that box as well.
So, when OBS.Live launches, you may have a window
just asking you to authenticate StreamElements
with your Twitch account.
Go through that as you would with any other authentication
and you should get a window
that looks something similar to this.
It's sort of a wizard asking me to set up the chat bot
and the tipping page.
I'm just going to skip it for now
because we'll come to it a little bit later.
I want to show you the main interface of OBS.Live.
So I'm just going to click skip.
Gives me a little warning here,
but I'm going to click got it.
I want to skip this as well, and there we are.
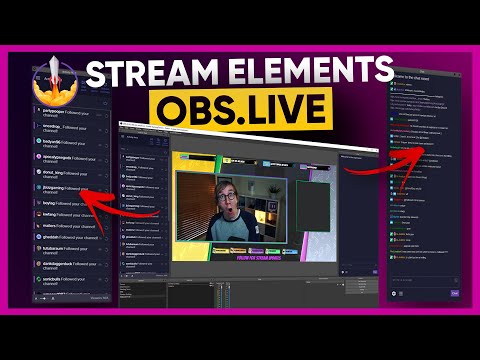
We're taken to OBS.Live.
So you can see it's exactly the same as OBS,
but with these two windows either side.
The left-hand side is the activity feed,
so this is the feed of followers, subscriptions, donations,
hosts, all the things that you need to see at a glance
whilst managing your stream.
And on the right-hand side you have
your Twitch or YouTube chat,
depending on which service you're streaming to.
Now one of the cool things about this just being a plugin
for OBS Studio is that you can take advantage
of OBS's ability to be able to rearrange these windows
however you like.
So, if you come up to the view menu,
go to docks, and untick the lock UI,
you can actually move around these elements
to have the layout exactly as you want.
So let's say that maybe you want to have the activity feed
across here on the same-hand side as the chat,
and then you can rearrange that exactly as you want.
Maybe you want to have, I don't know,
your mixer on the left-hand side
because it's a vertical mixer.
You can completely rearrange these
to be exactly as you want.
I mean, that doesn't look great,
but maybe if you resized the whole bar.
You can, (laughs)
my point is that you can rearrange these windows
to be however you would like,
and that is one of the main advantages of it being a plugin
rather than a full fork of the software.
You can even pop out these elements
to be completely separate from OBS
if you want to have them larger and maybe on, you know,
a second screen or something like that.
All you have to do is drag the element out of OBS,
and there you can see it's a completely separate window
that you can resize and have easily available
to you if you wanted to.
Now I just wanted to quickly cover
these elements individually.
Obviously the right-hand element is just your Twitch chat.
Nothing too fancy there.
You can reply to it.
You can read all your comments, and things like that.
But the left-hand side, this activity feed,
allows you to be able to see what has happened
on your stream recently.
So you can see I haven't streamed for, you know,
a week or so, but I've had some people following the channel
in the background.
You can filter out if you don't want to see followers,
or if you don't want to see tips below a certain amount,
or something like that.
So you can customize this to be exactly as you want,
particularly when live streaming.
Maybe you don't want to see
when somebody has followed your channel.
You just want events to show others.
All you would have to do is untick followers
and click filter.
You also have the ability to be able to skip or mute alerts,
as well as being able to reload overlays.
That's something that we'll cover a little bit later.
But you can see that,
maybe if you missed an alert whilst you
were taking a bathroom break or something,
you could replay each alert, whichever one you wanted,
by hitting this refresh icon.
Or you can skip alerts that, you know, are taking advantage
of text-to-speech or something like that,
and you also have an option down here
to be able to increase and decrease the size
depending on how good your eyesight is.
And, finally, a little area here in the bottom right
which will show you how many viewers
you have on your livestream currently.
So loads of great info to have at your fingertips,
and more really at a glance
as you look across to the OBS window.
So obviously this is super helpful,
but the real usefulness comes when you start
to integrate all of your alerts
and your overlays through StreamElements,
and then using this software as well.
So, if we head to the StreamElements dashboard
at streamelements.com, you click log in
in the top right corner.
You get taken to your dashboard, which looks like this.
It gives you some stats about your recent stream
as well as, you know,
the ability to go through some of their tutorials.
I'm just going to swap it to dark mode
because I'm an absolute lover of anything that is dark mode.
But let's have a look at the themes gallery.
This is a way of being able to have overlays
and all these different scenes set up for you
and you don't have to host any of these files
on your computer.
They all come through the browser source.
So there's performance benefits in there
as well as the benefit
of not having to manage any of the assets yourself.
So let's find one that we'd like a look at.
Surely they have, like,
a Fortnite themed one down here somewhere.
Here we go, Llama.
So I'm going to go with the Llama animated one.
You can click on it to view a preview
as to what the five scenes that you get.
I think you get five for each one,
sort of a game one, a chatting one, starting soon,
be right back, and stream ended.
So this looks good.
I'm going to click create my overlay,
give it a name, Fortnite, and click create my overlay.
And that is all I needed to do
to be given the browser sources that I then add in.
So I'm just going to take one of these.
The idea is that you take as many as you want
and you add them to individual scenes in OBS.
I'm going to take the talking one.
Just click copy.
Copy the link, and then head back to OBS.Live.
Come down to your sources in the scene that you want.
Add a browser source.
Name it what you want.
I'm going to name it Fortnite overlay.
Hit okay, and then paste in the URL that you just copied.
Set the width and height to 1920 by 1080.
They do support other resolutions.
You can edit that in your settings.
Click okay.
Give it a second to get it all, and there you go.
All the animations are in and live.
I'm just going to resize my camera because, obviously,
I wouldn't be that zoomed in.
So, if I come down here
and just drag that a little bit smaller,
yeah, something like that.
And how quick was that?
I've now got, I mean, it's not my taste,
but I've now got a Fortnite overlay added
by just adding one browser source.
And you can edit all of this data down at the bottom.
So, if you see here, we have, like,
our Twitch, YouTube, Instagram, Facebook, and Twitter.
If we go back to the dashboard
and click see theme in my overlays,
it'll take you to the my overlays section of the dashboard,
where you can then edit each of the overlays
that you've chosen.
So let's find the chat one.
Click edit.
It brings up this web interface
where you can edit every single aspect of the overlay,
and it will update live.
So you can come in here, click on the YouTube thing,
change the YouTube to /gamingcareers, if I can spell.
I would probably resize it a bit,
but you get the idea.
And this will all, when you click save,
it will all update within your streaming software as well.
These overlays also come with alerts already made for them.
So, if I went and chose one of these,
let's choose Partypooper.
Congratulations, you're famous.
And I replay the alert, it will come up on my stream
exactly as it is set up.
So these have already been built as well, the alerts.
You can rearrange them, change the colors,
all that kind of thing in the back end
of the software just on the website.
You can do exactly what you want,
customize how alerts are going to be,
where they're going to be positioned,
and all that kind of stuff.
Super simple interface.
Loads and loads of great overlays for you
straight away for free.
You just need to log into the dashboard
and go into the overlay section.
If you head back across to the StreamElements dashboard,
you can see that there's a whole load of features
down the left-hand side that you can play with.
And I don't have time to go through all of them.
It's probably going to require some separate videos.
But a few things I did want to mention is the chat bot.
If you set up the chat bot for your livestream,
there is so much customizability for this.
You can even actually change what the bot name is
if you download the software.
But you can see some of the default commands
that it comes with.
Loads of default commands already set up for you
which you can enable and disable.
You know, things like uptime so your viewers can see
how long you've been streaming for,
or follow age so they can see how long
they've been followed for,
or they can even test somebody else's follow age.
You can add all of your own custom commands.
Super simple to set up.
Loads and loads of customizability.
And the other thing that I wanted to quickly mention
is they have these modules for the chat bot.
These are ways of having, like,
cool features for the chat bot
that work for your livestream.
So one of the examples I'd love to go through
is chat alerts.
If you enable this,
then StreamElements will actually post in your chat
when somebody follows, subscribes, tips,
all those kind of things.
So you can actually have it posted in your chat
as well as posted in an alert over the tops of your stream.
This one is particularly useful if you are an IRL streamer
and you don't have the ability
to be able to be looking at a dashboard page
or OBS or something like that,
but you have the ability
to look at Twitch chat on your phone.
Well, then, StreamElements can tell you
when somebody follows, subscribes, or donates,
those kind of things, if you enable the chat alerts module.
Another cool one is Twitter.
So you can set this up with a few different Twitter accounts
and it will post the tweets in chat as a message
whenever somebody tweets on one of the accounts
that you're following.
There's some games, you know, roulette, raffle.
You can allow your viewers to duel points with each other.
They have a whole loyalty system built into StreamElements.
There's actually just so much functionality
that I couldn't go through this in one video,
but I did want to quickly mention how great
the chat bot functionality is in StreamElements.
The last thing that I quickly want to mention,
it's not technically to do with OBS.Live,
but, again, another advantage of using StreamElements
is that you can set up your own tipping page
that you can link to your viewers if they would like
to send you a tip or donation.
You can customize this to your heart's content
with colors and images
and exactly what text you want to show
and what payment methods you accept.
One of the really cool things is that StreamElements
is building a list of troublesome users that tip
and then chargeback, which,
for those of you that don't know,
costs you money through PayPal.
So you end up paying a large fee,
I think it's about $20, when somebody does a chargeback
on a tip that they sent you.
So they might only send you a $1 tip,
but, if they then chargeback, you end up paying a large fee.
Well, StreamElements are tackling this
by building a list of users that are known
for doing this kind of thing
and stopping them from being able to donate.
So it's a safer way.
I think this is definitely one of the reasons
that bigger streamers are moving across to StreamElements
because they're finding that they have less chargebacks.
So, yeah, you can completely set up your tipping page,
customize it to your heart's content.
Not technically to do with OBS.Live,
but I just thought I'd mention it quickly.
So I know we have covered a lot in a short amount of time,
but really I just wanted to get across
what OBS.Live is all about.
How lightweight it is
in terms of you still get to use OBS Studio.
You still get to use all of the plugins that are built in
or that you've downloaded for OBS Studio.
You get to use the latest version.
It's really just a lightweight couple of features
with the activity feed and the chat window
that integrate so nicely with the StreamElements backend.
It's just a really interesting project.
I'm definitely going to be checking it out
and using it on my live streams for the next few weeks
and seeing exactly how I find using it
and managing my stream with OBS.Live.
Thank you guys so much for watching.
If you have enjoyed the video
and you want to check out OBS.Live,
please do use the link at the top of the description.
That will help the guys at StreamElements know
that I have sent them over to you,
and they'll help me keep creating videos like this
for their software.
If you are new around here, I did say it at the beginning,
but please do check out the rest of the YouTube channel.
Subscribe with notifications on so you don't miss anything.
Thanks especially to all of those that joined me
in my last livestream.
I had a hell of a lot of fun.
Some frustrating moments as well,
but it was great to meet so many of you
after the Black Friday deals.
Thanks as always to my Patrons
who are supporting the creation of this content.
I do this as a full-time job,
and without them I could not keep creating these tutorials.
And I will see you all in the next video.
Peace.
Không có nhận xét nào:
Đăng nhận xét